Introduction
This document describes how to configure a repository on the Identity Service Engine (ISE).
Prerequisites
Requirements
Cisco recommends that you have knowledge of these topics:
- Basic knowledge of the Identity Service Engine (ISE).
- Basic Knowledge of File Transfer Protocol (FTP) server & SSH File transfer protocol (SFTP) server.
Components Used
The information in this document is based on these software and hardware versions:
- Cisco Identity Service Engine version 2.x.
- Working FTP server and SFTP server.
The information in this document was created from the devices in a specific lab environment. All of the devices used in this document started with a cleared (default) configuration. If your network is live, make sure that you understand the potential impact of any command.
Configuration
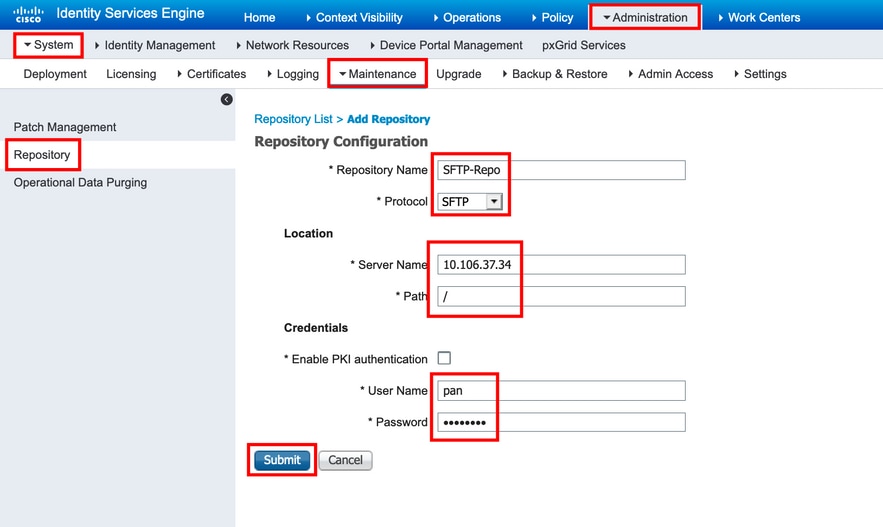
Configure SFTP Repository
Configure the SFTP Repository from the GUI
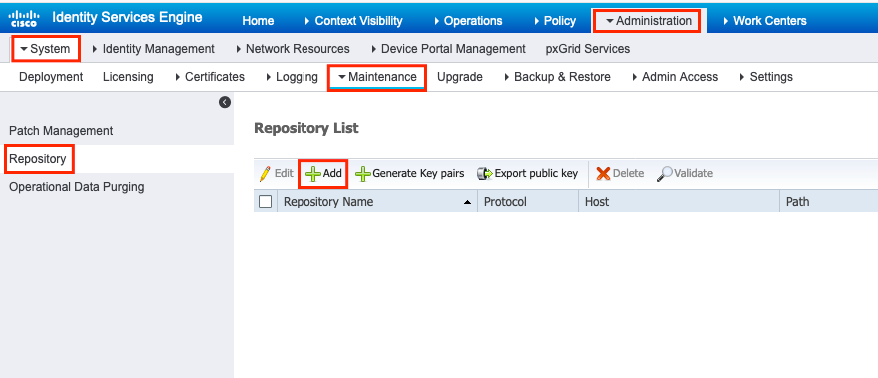
Step 1. In order to configure a repository on the ISE, login to the ISE GUI and navigate to Administration > System > Maintenance > Repository, Click Add, as shown in the image:
Step 3. Once you click Submit a pop-up message appears to add the host-key of the SFTP server using CLI, as shown in the image:
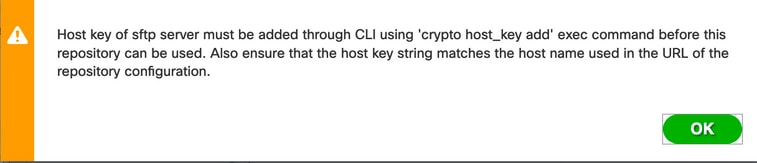
Step 4. Login to the CLI of the ISE node via SSH and add the host key using the command crypto host_key add host <ip address of the server>
ise/admin# crypto host_key add host 10.106.37.34
host key fingerprint added
Operating in CiscoSSL FIPS mode

# Host 10.106.37.34 found: line 1
10.106.37.34 RSA SHA256:exFnNITDhafaNPFr35x6kC1pR0iTP6xS+LBmtIXPfnk
ise/admin#
Configure SFTP Repository from the CLI
Login to the CLI of the ISE node via SSH and run the below commands.
ise/admin#

ise/admin# configure terminal
Enter configuration commands, one per line. End with CNTL/Z.
ise/admin(config)# repository SFTP-Repo
ise/admin(config-Repository)# url sftp://10.106.37.34/

ise/adminconfig-Repository)# user <Username> password plain <Password>
ise/admin(config-Repository)# exit
ise/admin(config)# exit
ise/admin#
Verify
The repository can be verified from both GUI and CLI of the ISE server.
Verify using GUI
In order to validate the repository using GUI, Navigate to Administration > System > Maintenance > Repository, select the repository, click Validate, as shown in the image:

We must get the Repository validated successfully response on the GUI upon clicking Validate, as shown in the image:
Verify using CLI
In order to validate the repository from the CLI, login to the ISE node via SSH and run the command “show repository <name of the repository>”. The output of the command lists the files present in the repository.
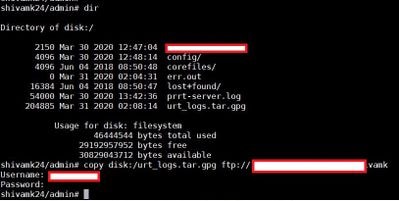
ise/admin#
ise/admin# show repository FTP-Repo
Config-Backup-CFG10-200307-1043.tar.gpg
ise/admin#
Upgrade Readiness Tool
Use the URT in order to detect and fix any configuration data upgrade issues before you start the upgrade process. Most of the upgrade failures occur because of configuration data upgrade issues. The URT validates the data before the upgrade in order to identify, and report or fix the issue, wherever possible. The URT is available as a separate downloadable bundle that can be run on a Secondary Policy Administration node or standalone node. There is no downtime to run this tool.
This video link explains How to use URT.
URT should be run on Secondary Administration Node or a standalone node.
Caution: The URT tool does not simulate Monitoring node (MnT) operational data upgrades.
Here is an example that demonstrates how to run URT on a standalone node (the same process can be followed on a Secondary Administration Node).
Step 1. Download the URT bundle.
Since the plan is to upgrade to version 2.6., download the URT published on Cisco.com for ISE 2.6 (ise-urtbundle-2.6.0.156-1.0.0.SPA.x86_64.tar.gz) as shown in the image.
 URT for 2.6
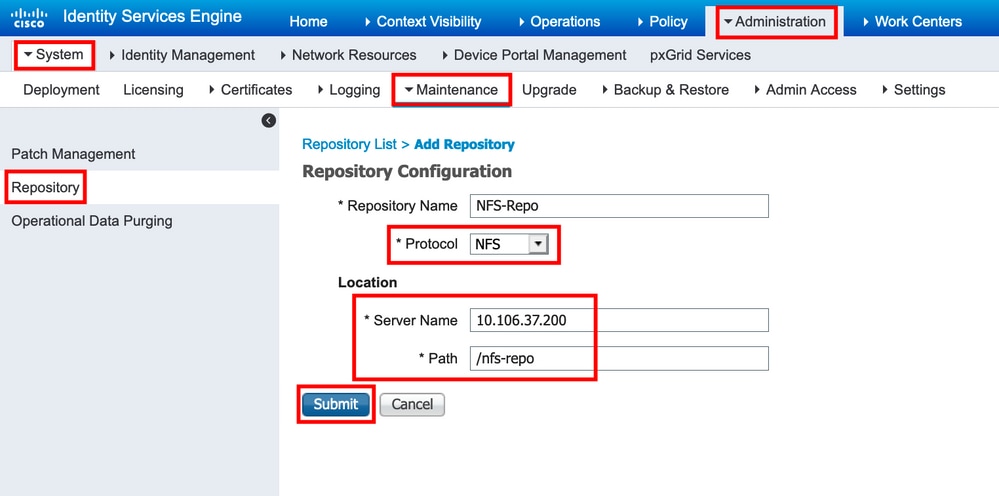
Step 2. Create a repository and copy the URT bundle.
It is recommended to use File Transfer Protocol (FTP) for better performance and reliability. Do not use repositories that are located across slow WAN links. It is suggested to use a local repository that is closer to the nodes.
From ISE GUI, navigate to Administration > System > Maintenance > Repository > Add as shown in the image.
 Repository
Optionally, in order to save time, copy the URT bundle to the local disk on the Cisco ISE node with the use of this command:
copy repository_url/path/ise-urtbundle-2.6.0.xxx-1.0.0.SPA.x86_64.tar.gz disk:/For example, if Secure FTP (SFTP) is used to copy the upgrade bundle, follow this:
(Add the host key if it does not exist) crypto host_key add host mySftpserver
copy sftp://aaa.bbb.ccc.ddd/ ise-urtbundle-2.6.0.xxx-1.0.0.SPA.x86_64.tar.gz disk:/
aaa.bbb.ccc.ddd is the IP address or hostname of the SFTP server and ise-urtbundle-2.6.0.xxx-1.0.0.SPA.x86_64.tar.gz is the name of the URT bundle.
Tip: It is recommended to have the URT bundle in the local disk in order to save time.
Step 3. Run the URT Bundle.
Enter the application install command in order to install the URT:
application install ise-urtbundle-2.6.0.x.SPA.x86_64.tar.gz reponame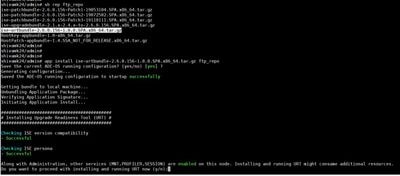
The warning talks about the services that are running on the node and if the user would still like to continue running the URT on this node. Type Y in order to proceed as shown in the image.

You might notice that sometimes the URT age is old. As long as the bundle is the latest one downloaded from Cisco’s website, it is ok to proceed further. The latest URT bundles can also be more than 45 days old. Type Y in order to proceed.
Case 1. URT Run is Successful
1. If the URT runs successfully, the output is similar to this:
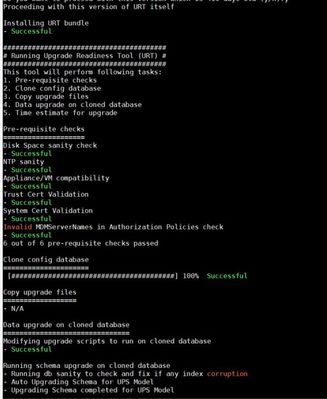
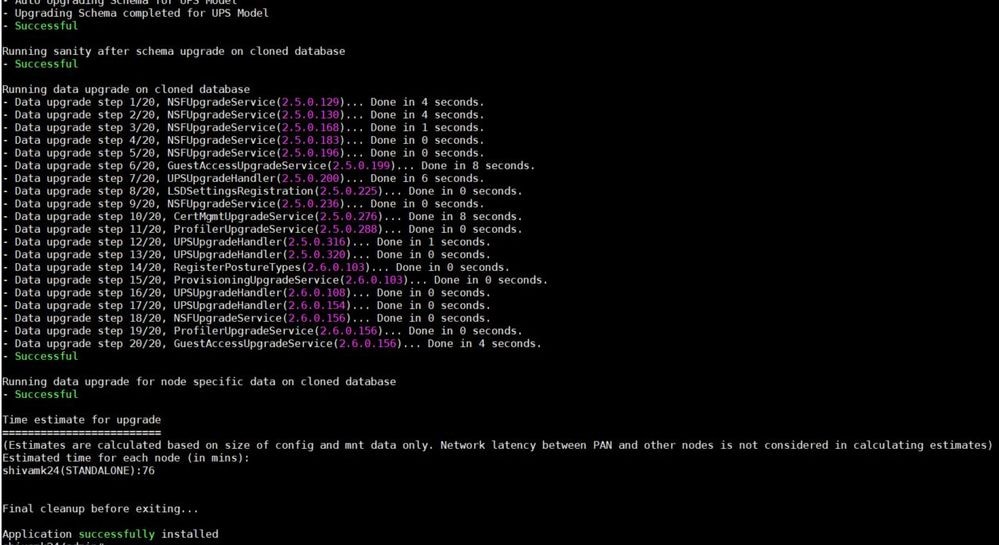
2. The URT provides an estimated time for each node’s upgrade based on the size of the configuration and MNT data.
3. After you have successfully completed the URT run, proceed to upgrade.
4. The URT:
- Checks if the URT is run on a supported version of Cisco ISE. The supported versions are Releases 2.1, 2.2, 2.3, and 2.4 (for upgrading to version 2.6).
- Verifies that the URT is run on a standalone Cisco ISE node or a Secondary Policy Administration Node (secondary PAN).
- Checks if the URT bundle is less than 45 days old – This check is done to ensure that you use the most recent URT bundle.
Checks if all the prerequisites are met.
These are the prerequisites that are checked by the URT:
- Version compatibility
- Persona checks
- Disk space
Note: Verify the available disk size with Disk Requirement Size. If you are required to increase the disk size, reinstall ISE and restore a config backup.
- NTP server
- Memory
- System and trusted certificate validation
5. Clones the configuration database.
6. Copies latest upgrade files to the upgrade bundle.
Note: If there are no patches in URT bundle then the output will return:N/A.This is expected behaviour when you install a hot patch.
7. Performs a schema and data upgrade on the cloned database.
- If the upgrade on the cloned database is successful, it provides an estimate of the time it should take for the upgrade to end.
- If the upgrade is successful, it removes the cloned database.
- If the upgrade on cloned database fails, it collects the required logs, prompts for an encryption password, generates a log bundle, and stores it in the local disk.
Case 2. URT Run is Unsuccessful
1. The URT can fail due to a reason that can cause issues with the upgrade. If that happens, URT returns the cause of failure.
2. Here is an example run of URT failure:
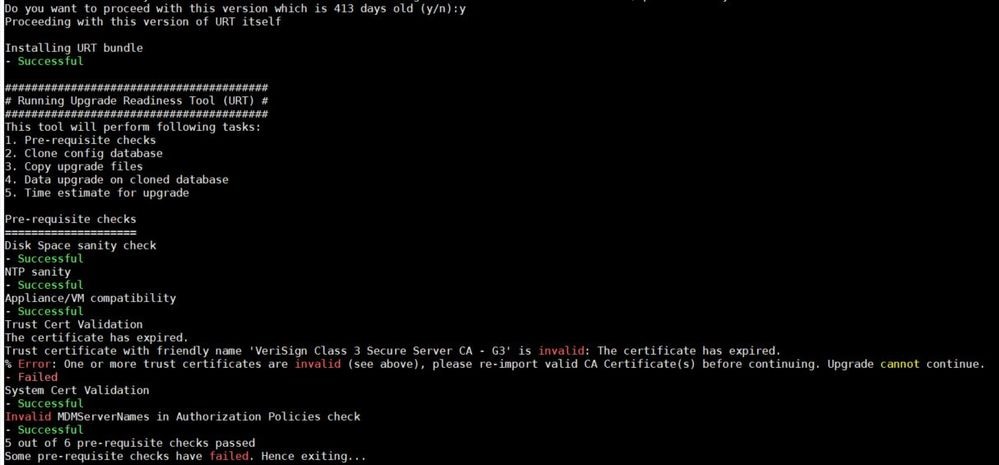
3. The URT failed with the reason: Trust certificate with the friendly name ‘VeriSign Class 3 Secure Server CA – G3’ is invalid: The certificate has expired.
4. As explained in the upgrade pre-checks, if ISE system has any expired certificates, the upgrade will fail. It is required that all expired certificates are either renewed or replaced.
5. URT saves the failure logs which can be shared with Cisco TAC if the user is unsure of the failure reason.
6. It will prompt to enter a password to encrypt the logs. These URT logs are saved in the local disk.

7. Copy them from the local disk to a repository and share it with Cisco TAC for resolution.
Upgrade ISE
Before the upgrade begins, ensure that these tasks are completed:
1. Obtain a backup of the ISE configuration and operational data.
2. Obtain a backup of the system logs.
3. Disable scheduled backups. Reconfigure the backup schedules after deployment upgrade is complete.
4. Export the certificates and private keys.
5. Configure a repository. Download the upgrade bundle and place it in the repository.
6. Make a note of Active Directory (AD) join credentials and RSA SecurID node secret, if applicable. This information is needed to connect to Active Directory or RSA SecurID server after the upgrade.
7. Purge the operational data to improve upgrade performance.
8. Ensure that the Internet connection to the repository is good.
Note: The download of upgrade bundle from a repository to a node times out if it takes more than 35 minutes to complete.
Prepare for Upgrade:
Latest Patch: Upgrade to the latest patch in the existing version before upgrade.
Staging Environment: It is recommended to test the upgrade in a staging environment to identify and fix any upgrade issues before upgrading the production networks.
Patch Level: All the nodes in the Cisco ISE deployment should be in the same patch level in order to exchange data.
Note: If all the nodes in the deployment are not on the same Cisco ISE version and patch version, a warning message: “Upgrade cannot begin” is shown. This message indicates that the upgrade is in a blocked state. Ensure that all the nodes in the deployment are in the same version (including the patch version, if any) before the upgrade process starts.
Operational Data (logs): It is a best practice to archive the old logs and not transit them to the new deployments. This is because operational logs restored in the MnTs are not synchronized to different nodes in case the MnT roles are changed later. If the plan is to retain the MnT logs, perform these tasks for MnT nodes and join the new deployment as MnT nodes. However, if there is no need to retain the operational logs, this can be skipped by re-imaging the MnT nodes.
In case of a necessary re-image: Cisco ISE installation can be done in parallel if it is multi-node deployment without impact to the production deployment. When you install ISE servers in-parallel, it saves time especially when backup and restores from a previous release are used. PSNs can be added to the new deployment to download the existing policies at the time of the registration process from the PAN.
Use ISE latency and bandwidth calculator in order to understand the latency and bandwidth requirement in Cisco ISE deployment.
HA Datacenters: If there are Data Centers (DC) with full distributed deployment, upgrade the backup DC and test the use cases before you upgrade primary DC.
Download a day before: Download and store the latest upgrade bundle for the upgrade in a local repository before upgrade to speed up the process.
Time Prediction: For ISE upgrade from GUI, the timeout for the process is four hours. If the process takes more than four hours, the upgrade fails. If the URT takes more than four hours, Cisco recommends to use CLI for this process.
Load Balancers: Take the backup of load balancers before you change the configuration. Remove the PSNs from the load balancers at the time of the upgrade window and add them back after the upgrade.
PAN Failover: Disable automatic PAN Failover (if configured) and disable Heartbeat between PANs at the time of the upgrade.
Review Policies: Review the existing policies and rules and remove outdated, redundant, and stale policy and rules.
Unwanted Logs: Remove unwanted monitoring logs and endpoint data.
Bug Check: Use the Bug Search Tool in order to find the upgrade related defects which are open or fixed.
Post Upgrade: Test all the use cases for the new deployment with fewer users in order to ensure service continuity.
Upgrade ISE from the GUI
The GUI-based upgrade from the Admin portal is supported only if ISE is on Release 2.0 or later and needs an upgrade to Release 2.0.1 or later.
In case this warning message is seen: “The node has been reverted to its pre-upgrade state”, navigate to the Upgrade window, click the Details link. Address the issues that are listed in the Upgrade Failure Details window. After all those issues are fixed, click Upgrade to reinitiate the upgrade.
Step 1. Click the Upgrade tab in the Admin portal.
Step 2. Click Proceed.
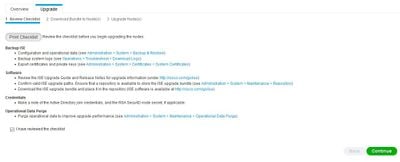
Step 3. Check the ‘I have reviewed the checklist’ checkbox, and click Continue.
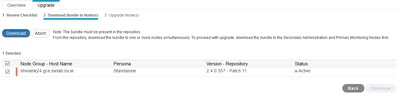
Step 4. Download the upgrade bundle from the repository to the nodes:
1. Check the checkbox next to the nodes to which the bundle should be downloaded.
2. Click Download. The Select Repository and Bundle window appears as shown in the image.
3. Select the repository.
4. Check the checkbox next to the bundle that will be used for the upgrade.
5. Click Confirm. Once the bundle is downloaded to the node, the node status changes to Ready for Upgrade.
Step 5. Click Continue. Then, the Upgrade Nodes window appears. Click Upgrade in order to begin.
Upgrade ISE from the CLI
Ensure to read the chapter titled ‘Before you begin’ before you proceed. Here is an example of a standalone ISE node upgrade from CLI.
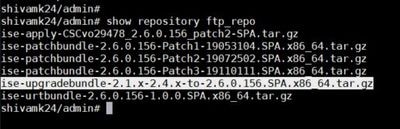
Step 1. Check if the repository to be used has the upgrade file present with the use of command show repository reponame as shown in the image.
Step 2. From the Cisco ISE Command Line Interface (CLI), enter application upgrade prepare command with the bundle file name and repository name where the file is stored.

Step 3. From the Cisco ISE CLI, enter the application upgrade proceed command as shown in the image.
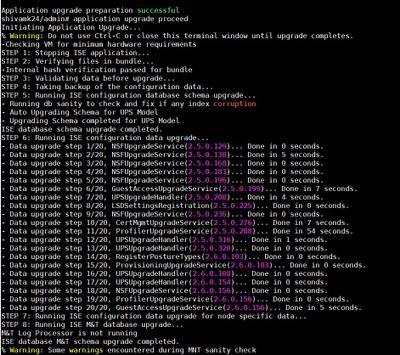
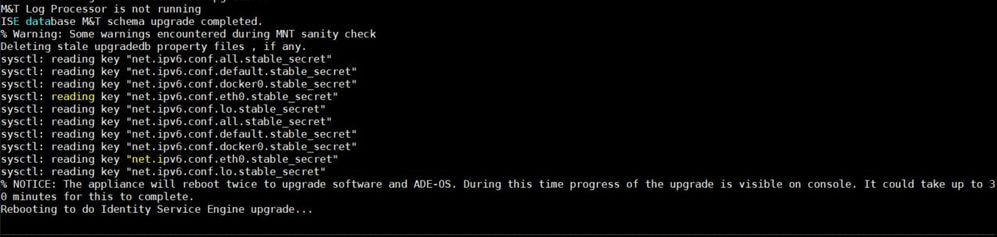
Once this message appears, start an SSH session after 30 minutes and run the show application status ise command in order to see the progress. This message appears % NOTICE: Identity Services Engine upgrade is in progress…
The upgrade is considered complete when all the expected services’ status change to running.
Note: If the upgrade fails for some reason. Before you attempt an upgrade again, use the command application upgrade cleanup in order to clear out the old files.
Common Issues
1. If the Bundle takes too long to download from the repository or times out when downloaded via GUI:
- Ensure there is enough bandwidth to handle the bundle download.
- When an upgrade bundle is downloaded from a repository to a node, the download times out if it takes more than 35 minutes to complete. Ensure that the Internet connection to the repository is good.
2. In a distributed deployment upgrade, the error “No Secondary Administration Node in the Deployment” can be seen when:
- There is no Secondary Administration node in the deployment.
- The Secondary Administration node is down.
- The Secondary Administration node is upgraded and moved to the upgraded deployment. Typically, this occurs if the Refresh Deployment Details option is used after the Secondary Administration node is upgraded.
In order to resolve this issue, perform one of these tasks, as applicable:
- If the deployment does not have a Secondary Administration node, configure a Secondary Administration node and retry the upgrade.
- If the Secondary Administration node is down, bring up the node and retry the upgrade.
- If the Secondary Administration node is upgraded and moved to the upgraded deployment, use the CLI to manually upgrade the other nodes in the deployment.
3. Upgrade status for a node has not changed:
- If the upgrade status does not change for a long time (and remains at 80%) in the GUI, check the upgrade logs from the CLI or the status of the upgrade from the console.
- Log in to the CLI or view the console of the Cisco ISE node in order to view the progress of the upgrade. Use the show logging application command in order to view the upgrade-uibackend-cliconsole.log and upgrade-postosupgrade-yyyymmdd-xxxxxx.log.
- View these upgrade logs from the CLI with the show logging application command: DB Data Upgrade Log, DB Schema Log and Post OS Upgrade Log.
4. Roll back to the previous version of ISO image:
- In rare cases, there might be a need to reimage the Cisco ISE appliance with the previous version image and restore the data from the backup file. After the data restore, register with the old deployment, and enable the personas as done in the old deployment. Hence, it is recommended to back up the Cisco ISE configuration and operational data before the upgrade process starts.
- Sometimes, upgrade failures that occur because of issues in the configuration and monitoring database are not rolled back automatically. When this occurs, a notification appears that states that the database is not rolled back, along with an upgrade failure message. In such scenarios, manually reimage the system, install Cisco ISE, and restore the configuration data and operational data (if the MnT persona is enabled).
- Generate a support bundle with the backup-logs command before a rollback or recovery attempt, and place the support bundle in a remote repository for investigation later by TAC if required.
Leave A Comment?