Prerequisites
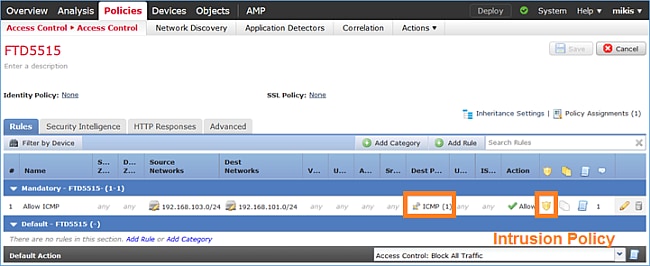
There is an Access Control Policy (ACP) applied on FTD that allows Internet Control Message Protocol (ICMP) traffic to go through. The policy also has an Intrusion Policy applied:
Requirements
- Enable capture on FTD CLISH mode using no filter.
- Ping through the FTD and check the capture output.
Solution
Step 1. Log in to the FTD console or SSH to the br1 interface and enable capture on FTD CLISH mode using no filter.
> capture-traffic

Please choose domain to capture traffic from:
  0 - br1
  1 - Router

Selection? 1

Please specify tcpdump options desired.
(or enter '?' for a list of supported options)
Options:
On FTD 6.0.x the command is:
> system support capture-traffic
Step 2. Ping through FTD and check the capture output.
> capture-traffic

Please choose domain to capture traffic from:
  0 - br1
  1 - Router

Selection? 1

Please specify tcpdump options desired.
(or enter '?' for a list of supported options)
Options:
12:52:34.749945 IP olab-vl603-gw.cisco.com > olab-vl647-gw.cisco.com: ICMP echo request, id 0, seq 1, length 80
12:52:34.749945 IP olab-vl647-gw.cisco.com > olab-vl603-gw.cisco.com: ICMP echo reply, id 0, seq 1, length 80
12:52:34.759955 IP olab-vl603-gw.cisco.com > olab-vl647-gw.cisco.com: ICMP echo request, id 0, seq 2, length 80
12:52:34.759955 IP olab-vl647-gw.cisco.com > olab-vl603-gw.cisco.com: ICMP echo reply, id 0, seq 2, length 80
12:52:34.759955 IP olab-vl603-gw.cisco.com > olab-vl647-gw.cisco.com: ICMP echo request, id 0, seq 3, length 80
12:52:34.759955 IP olab-vl647-gw.cisco.com > olab-vl603-gw.cisco.com: ICMP echo reply, id 0, seq 3, length 80
12:52:34.759955 IP olab-vl603-gw.cisco.com > olab-vl647-gw.cisco.com: ICMP echo request, id 0, seq 4, length 80
12:52:34.759955 IP olab-vl647-gw.cisco.com > olab-vl603-gw.cisco.com: ICMP echo reply, id 0, seq 4, length 80
^C	<- to exit press CTRL + C
Work with Snort Engine Captures
Requirements
- Enable capture on FTD CLISH mode using a filter for IP 192.168.101.1.
- Ping through FTD and check the capture output.
Solution
Step 1. Enable capture on FTD CLISH mode using a filter for IP 192.168.101.1.
> capture-traffic

Please choose domain to capture traffic from:
  0 - br1
  1 - Router

Selection? 1

Please specify tcpdump options desired.
(or enter '?' for a list of supported options)
Options: host 192.168.101.1
Step 2. Ping through the FTD and check the capture output:
13:28:36.079982 IP olab-vl647-gw.cisco.com > olab-vl603-gw.cisco.com: ICMP echo reply, id 3, seq 0, length 80
13:28:36.079982 IP olab-vl647-gw.cisco.com > olab-vl603-gw.cisco.com: ICMP echo reply, id 3, seq 1, length 80
13:28:36.079982 IP olab-vl647-gw.cisco.com > olab-vl603-gw.cisco.com: ICMP echo reply, id 3, seq 2, length 80
13:28:36.079982 IP olab-vl647-gw.cisco.com > olab-vl603-gw.cisco.com: ICMP echo reply, id 3, seq 3, length 80
13:28:36.079982 IP olab-vl647-gw.cisco.com > olab-vl603-gw.cisco.com: ICMP echo reply, id 3, seq 4, length 80
You can use the –n option to see the hosts and port numbers in numeric format. For example, the previous capture will be shown as:
> capture-traffic

Please choose domain to capture traffic from:
  0 - br1
  1 - Router

Selection? 1

Please specify tcpdump options desired.
(or enter '?' for a list of supported options)
Options: -n host 192.168.101.1
13:29:59.599959 IP 192.168.101.1 > 192.168.103.1: ICMP echo reply, id 5, seq 0, length 80
13:29:59.599959 IP 192.168.101.1 > 192.168.103.1: ICMP echo reply, id 5, seq 1, length 80
13:29:59.599959 IP 192.168.101.1 > 192.168.103.1: ICMP echo reply, id 5, seq 2, length 80
13:29:59.599959 IP 192.168.101.1 > 192.168.103.1: ICMP echo reply, id 5, seq 3, length 80
13:29:59.599959 IP 192.168.101.1 > 192.168.103.1: ICMP echo reply, id 5, seq 4, length 80
Tcpdump Filter Examples
Example 1
In order to capture Src IP or Dst IP = 192.168.101.1 and Src port or Dst port = TCP/UDP 23, enter this command:
Options: -n host 192.168.101.1 and port 23
Example 2
In order to capture Src IP = 192.168.101.1 and Src port = TCP/UDP 23, enter this command:
Options: -n src 192.168.101.1 and src port 23
Example 3
In order to capture Src IP = 192.168.101.1 and Src port = TCP 23, enter this command:
Options: -n src 192.168.101.1 and tcp and src port 23
Example 4
In order to capture Src IP = 192.168.101.1 and see the MAC address of the packets add the ‘e’ option, enter this command:
Options: -ne src 192.168.101.1
17:57:48.709954 6c:41:6a:a1:2b:f6 > a8:9d:21:93:22:90, ethertype IPv4 (0x0800), length 58: 192.168.101.1.23 > 192.168.103.1.25420:
 Flags [S.], seq 3694888749, ack 1562083610, win 8192, options [mss 1380], length 0
Example 5
In order to exit after you capture 10 packets, enter this command:
Options: -n -c 10 src 192.168.101.1
18:03:12.749945 IP 192.168.101.1.23 > 192.168.103.1.27287: Flags [.], ack 3758037348, win 32768, length 0
18:03:12.749945 IP 192.168.101.1.23 > 192.168.103.1.27287: Flags [P.], ack 1, win 32768, length 2
18:03:12.949932 IP 192.168.101.1.23 > 192.168.103.1.27287: Flags [P.], ack 1, win 32768, length 10
18:03:13.249971 IP 192.168.101.1.23 > 192.168.103.1.27287: Flags [.], ack 3, win 32768, length 0
18:03:13.249971 IP 192.168.101.1.23 > 192.168.103.1.27287: Flags [P.], ack 3, win 32768, length 2
18:03:13.279969 IP 192.168.101.1.23 > 192.168.103.1.27287: Flags [.], ack 5, win 32768, length 0
18:03:13.279969 IP 192.168.101.1.23 > 192.168.103.1.27287: Flags [P.], ack 5, win 32768, length 10
18:03:13.309966 IP 192.168.101.1.23 > 192.168.103.1.27287: Flags [.], ack 7, win 32768, length 0
18:03:13.309966 IP 192.168.101.1.23 > 192.168.103.1.27287: Flags [P.], ack 7, win 32768, length 12
18:03:13.349972 IP 192.168.101.1.23 > 192.168.103.1.27287: Flags [.], ack 9, win 32768, length 0
Example 6
In order to write a capture to a file with name capture.pcap and copy it via FTP to a remote server, enter this command:
Options: -w capture.pcap host 192.168.101.1
CTRL + C <- to stop the capture
> file copy 10.229.22.136 ftp / capture.pcap
Enter password for ftp@10.229.22.136:
Copying capture.pcap
Copy successful.

>
Leave A Comment?